如何在WordPress中添加自定义帖子类型的图标
有没有想过如何在WordPress中为自定义帖子类型添加自定义图标?如果是这样,那么你就是在正确的地方。在本文中,我们将向您展示如何在WordPress中为自定义帖子类型添加图标。
自WordPress 3.8以来,WordPress开始使用名为Dashicons的图标字体。这些字体图标在任何设备或屏幕尺寸上都很棒。好吧,您可以利用这些图标为帖子类型分配自定义图标。
视频教程
订阅WPBeginner
如果您不喜欢视频或需要更多说明,然后继续阅读。
使用插件添加自定义帖子类型图标
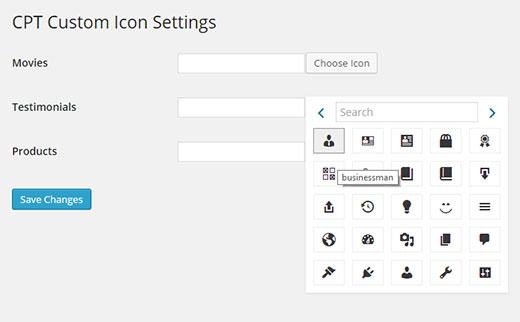
您需要做的第一件事是安装并激活CPT自定义图标插件。激活后,只需转到设置»CPT自定义图标设置,您将看到列出的自定义帖子类型。接下来,单击自定义帖子类型旁边的“选择图标”按钮,然后从菜单中选择一种字体。
使用自定义帖子类型UI插件添加图标
如果您是注册自定义帖子类型的新手,那么我们建议您使用自定义帖子类型UI插件来创建和管理自定义帖子类型和分类。
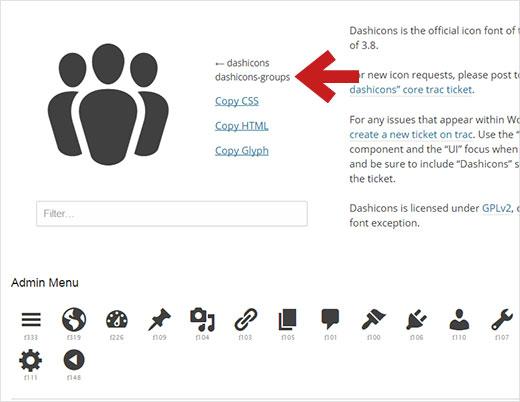
将图标添加到使用CPT UI插件创建的自定义帖子类型非常简单。它默认支持Dashicons,因此首先您需要访问Dashicons网站并选择要用于帖子类型的图标。
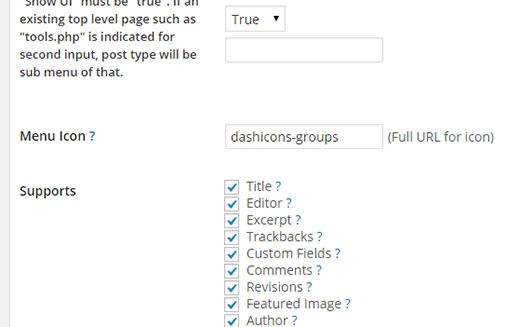
单击列表中的图标将在顶部显示更大版本的图标。在它旁边,您将看到图标的CSS类。它将类似于dashicons-groups,dashicons-calendar,dashicons-cart等。您需要复制CSS类并编辑要在CPT UI中编辑的自定义帖子类型。您需要做的就是单击高级选项链接并向下滚动到菜单图标部分,然后粘贴CSS类并保存更改。
您也可以自己创建一个图像图标并通过单击上传它来媒体»添加新的。上传后,单击“编辑”链接并复制图像文件URL。现在只需将此URL粘贴到CPT UI设置的菜单图标字段中即可。
手动将图标添加到自定义帖子类型
如果您通过在特定于站点的插件或functions.php文件中放置代码来创建自定义帖子类型,则可以手动添加菜单图标。再次访问Dashicons网站,选择一个图标并复制CSS类。在此之后将其添加到您的自定义帖子类型代码中:
"menu_icon" => "dashicons-cart",
您还可以添加要显示为图标的图像文件的完整URL,如下所示:
"menu_icon" => "http://www.example.com/wp-content/uploads/2014/11/your-cpt-icon.png",
这是一个完整的创建一个名为带有菜单图标的产品的自定义帖子类型的代码段:
// Register Custom Post Type function custom_post_type() { $labels = array( "name" => _x( "products", "Post Type General Name", "text_domain" ), "singular_name" => _x( "Product", "Post Type Singular Name", "text_domain" ), "menu_name" => __( "Products", "text_domain" ), "parent_item_colon" => __( "Parent Item:", "text_domain" ), "all_items" => __( "All Items", "text_domain" ), "view_item" => __( "View Item", "text_domain" ), "add_new_item" => __( "Add New Item", "text_domain" ), "add_new" => __( "Add New", "text_domain" ), "edit_item" => __( "Edit Item", "text_domain" ), "update_item" => __( "Update Item", "text_domain" ), "search_items" => __( "Search Item", "text_domain" ), "not_found" => __( "Not found", "text_domain" ), "not_found_in_trash" => __( "Not found in Trash", "text_domain" ), ); $args = array( "label" => __( "Products", "text_domain" ), "description" => __( "Post Type Description", "text_domain" ), "labels" => $labels, "supports" => array( ), "taxonomies" => array( "category", "post_tag" ), "hierarchical" => false, "public" => true, "show_ui" => true, "show_in_menu" => true, "show_in_nav_menus" => true, "show_in_admin_bar" => true, "menu_position" => 5, "menu_icon" => "dashicons-cart", "can_export" => true, "has_archive" => true, "exclude_from_search" => false, "publicly_queryable" => true, "capability_type" => "page", ); register_post_type( "Products", $args ); } // Hook into the "init" action add_action( "init", "custom_post_type", 0 );
我们希望本文可以帮助您在WordPress中为自定义帖子类型添加图标。您可能还想了解如何在WordPress帖子编辑器中使用图标字体。
如果您喜欢这篇文章,请订阅我们的YouTube频道WordPress视频教程。您也可以在Twitter和Google +上找到我们。


