如何在WordPress中显示带缩略图的精选帖子
网上有很多方法可以显示精选帖子。但几乎所有的功能和插件都缺乏一些东西。在本教程中,我们将共享一个功能,允许用户选择特定的帖子ID,并使用WordPress 2.9中添加的WordPress Post Thumbnail功能将其显示为带缩略图的精选帖子。这种方式允许您避免使用由于自定义项目中的其他功能而有时可能需要的Sticky帖子。
注意:这是一个多部分教程,因此我们建议您对WordPress有一些了解,PHP ,HTML和CSS。
我们修改了San W3C Gallery的插件精选帖子列表。尽管San创建了一个高级版本的插件来显示图像,但它需要一个自定义字段。这样你就可以在2.9中使用Post Thumbnail功能了。
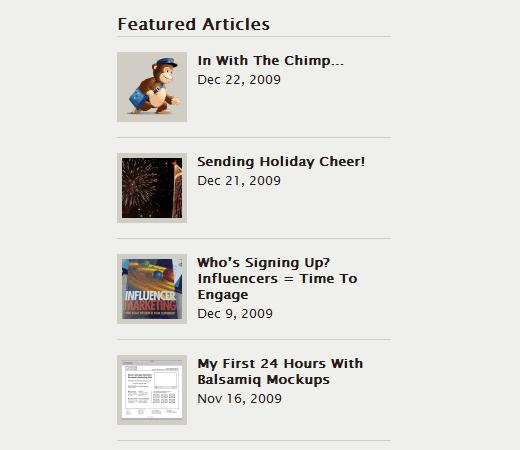
最终产品
Modified Plugin
首先你需要将下面的代码粘贴到 functions.php中文件 OR 在一个单独的文件中并将其作为插件上传。
<?php /* Plugin Name: Featured Posts List with Thumbnail Plugin URI: http://www.w3cgallery.com/w3c-css/display-specificmultiple-posts-as-featured-post-list-plugins Description: Display specific/multiple posts List with Thumbnails on your sidebar or any place of your site. It creates a tab "Featured Posts List" in "Settings" tab Version: 2.0 Author: SAN – w3cgallery.com & Windowshostingpoint.com & Syed Balkhi Author URI: http://www.w3cgallery.com/ */ // Main function to diplay on front end function featuredpostsList() { global $post, $wpdb, $posts_settings; // posts_id from database $posts_id = $posts_settings["posts_id"]; if($posts_id) { $posts_idarray = explode(",",$posts_id); foreach ($posts_idarray as $list){ $post = new WP_Query("p=".$list.""); $post->the_post(); ?> <div > <div ><a href="<?php the_permalink(); ?>" title="<?php the_title(); ?>"><?php the_post_thumbnail(); ?></a></div> <div > <h5><a href="<?php the_permalink() ?>" rel="bookmark"><?php the_title(); ?></a></h5> <div ><?php the_time("M j, Y") ?></div> </div> </div> <?php } } else { echo $before ."None found". $after; } } $data = array( "posts_id" => "" ); $ol_flash = ""; $posts_settings = get_option("posts_settings"); // ADMIN PANLE SEETTING function posts_add_pages() { // Add new menu in Setting or Options tab: add_options_page("Featured Posts List", "Featured Posts List", 8, "postsoptions", "posts_options_page"); } /* Define Constants and variables*/ define("PLUGIN_URI", get_option("siteurl")."/wp-content/plugins/"); /* Functions */ function posts_options_page() { global $ol_flash, $posts_settings, $_POST, $wp_rewrite; if (isset($_POST["posts_id"])) { $posts_settings["posts_id"] = $_POST["posts_id"]; update_option("posts_settings",$posts_settings); $ol_flash = "Your Featured List has been saved."; } if ($ol_flash != "") echo "<div ><p>" . $ol_flash . "</p></div>"; echo "<div >"; echo "<h5>Add Posts ID to Create Featured Post List</h5>"; echo "<table ><form action="" method="post"> <tr><td colspan="2"><strong>This plugin gives full freedom to display multiple posts as Featured Post List to your site.</strong></td></tr> <tr><td><strong>Post ID :</strong></td><td><input type="text" name="posts_id" value="" . htmlentities($posts_settings["posts_id"]) . "" size="50%" /></td></tr> <tr><td colspan="2"><strong>SAN Hint: To Add Multiple Post IDs use " , " for exmple : " 1, 2, 3" </strong></td></tr> </table>"; echo "<Div ><input type="submit" value="Save your list" /></div> <p>Paste this code into where you want it to display featured posts list <strong><?php featuredpostsList(); ?></strong> <br/> Or you can pass variable before and after like this default setting <strong><?php featuredpostsList($before = <li>", $after = </li>") ?></strong></p> </form>"; echo "</div>"; } add_action("admin_menu", "posts_add_pages"); ?>
完成后,您可以通过将代码粘贴到您的任何位置来显示它模板文件:
<?php featuredpostsList(); ?>
自定义CSS
我们正在使用自定义CSS类,因此您也需要它们。将以下代码粘贴到style.css文件中。
.popcontainer{ border-bottom: 1px solid #D0CDC5; width: 274px; float: left; padding: 0 0 15px 0; margin: 0 0 15px 0; } .popthumb{ width: 60px; float: left; background: #D0CDC5; padding: 5px; margin: 0 10px 0 0; } .popcontent{ width: 185px; float: left; } .popcontent h5{ font-size: 13px; margin: 0 0 3px 0; padding: 0; } .popcontent h5 a{ text-decoration: none; }
高级选项
上面的代码将提取您的默认缩略图并显示帖子标题和帖子发布日期。唯一的问题是,如果你想使用不同大小的缩略图。您的主题可能在其他地方使用缩略图功能,因此您不能使用当前代码的两种不同尺寸。因此,您必须稍微调整一下并添加新的图像大小。
打开您的functions.php并找到缩略图代码并添加以下代码:
add_theme_support( "post-thumbnails" ); set_post_thumbnail_size( 150, 150, true ); // Normal post thumbnails add_image_size( "featured-thumbnail", 60, 60 ); // Featured thumbnail size
现在找到以下代码行上面的插件:
<div ><a href="<?php the_permalink(); ?>" title="<?php the_title(); ?>"><?php the_post_thumbnail(); ?></a></div>
并将其替换为:
<div ><a href="<?php the_permalink(); ?>" title="<?php the_title(); ?>"><?php the_post_thumbnail("featured-thumbnail"); ?></a></div>
这将允许您有两种不同的大小。
另一个已知的问题是如果你的缩略图不成比例,它会导致显示较小的图像而不是60 x 60px,因为WordPress没有裁剪能力。为避免这种情况,您可以使用具有裁剪功能的附加图像大小插件。将自定义图像大小命名为features-thumbnail,并使用与上面相同的代码替换原始代码。
我们使用此方法的唯一原因是因为我们使用Sticky帖子来显示另一个列表。您也可以使用粘贴帖子来实现此目的。对于缩略图技巧,我们选择了附加图像大小插件,因为我们希望避免使用TimThumb JavaScript并维护快速加载站点。


